|
|
|
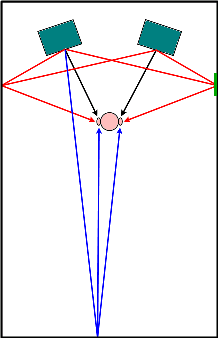
WHAT A useful goal for any room where music plays through loudspeakers is to create a Reflection Free Zone (RFZ) at the listening position. The concept is very simple - to prevent "early reflections" (sometimes called first reflections) from obscuring the stereo image. This occurs when sound from the loudspeakers arrives at your ears through two different paths - one direct and the other delayed after reflecting off a nearby wall, or the ceiling or floor. Just as damaging is when sound from the left loudspeaker bounces off the right wall and arrives at the right ear, and vice versa. Similarly, early reflections off the ceiling and floor can also harm clarity and imaging. In all cases the reflections obscure fine detail making it difficult to localize the source of the sound or musical instrument. Another reason to avoid early reflections is to increase the apparent width of the music. Many audiophiles believe that reflections in a listening room contribute to spaciousness. On the surface this makes sense, though in truth allowing early reflections makes music sound smaller, not larger. Ambience and reverb already present in many recordings is often of a large space - a concert hall, a movie scoring sound stage, or created with artificial reverb. But when played back in a small untreated room, the strong small-room reflections drown out the larger sounding reverb in the recording. This makes the music sound smaller and narrower, not larger and wider. The drawing at left, viewed from above, shows the three main paths by which sound from a loudspeaker arrives at your ears. The direct sound is shown as black lines. The early reflections - a single bounce off a nearby surface - are the red lines, and late echoes and ambience arrive as shown in blue. In truth, the blue lines are much more complex and dense than the single path shown here, but this is sufficient to explain the concept. The general goal of a Reflection Free Zone is to eliminate the red early reflection paths by placing absorbing panels such as RFZ Panels, MicroTraps, or HF type MiniTraps on the side walls in key locations. Not shown, but just as important to avoid, are early reflections off the ceiling, floor, and mixing desk if present. |
| Click the images below to see them full size.
|
WHY When a direct sound is accompanied by an echo that arrives within 20 milliseconds or less, the ear is unable to distinguish the echo as a separate sound source. So instead of hearing ambience or echoes, the same sound from a loudspeaker comes from different directions which obscures clarity and confuses the stereo image. You can still tell when an instrument is fully left or right, but in-between positions are not as well defined. Put another way, listening to music in a Reflection Free Zone is similar to listening with headphones - musical instruments sound clearer, and their placement in the stereo field is much better defined. Another important reason to control early reflections with absorption is to reduce comb filtering. This is a very specific type of frequency response error that's caused when a source and its reflections combine in the air. Depending on the difference in arrival times, some frequencies are boosted and others are reduced. The graph in Figure 1 at left shows the comb filter frequency response measured with and without MicroTraps at the first reflection points. You can learn more about this effect in the Comb Filtering video on our Videos page. When the budget allows for dedicated construction, early reflections can be avoided by angling the side walls and sloping the ceiling upward. The control room at left was designed by noted studio designer Wes Lachot, and offers a beautiful example of such construction. Given a large enough angle - at least 35 degrees - the reflections are directed behind the listening position without having to apply absorbing materials to the walls or ceiling. This lets you better control the overall ambience in the room because you don't need additional absorption just to get rid of the reflections. But most people do not have the luxury of building new walls, so the only option is to apply absorption at key locations. Top HOW The easiest way to tell where to place absorption to avoid early reflections is with a mirror. This is the thin green object to the right of the listener against the wall in the drawing. While you sit in the listening position, have a friend place a mirror flat against the side walls and move it around. Any location in which you can see either loudspeaker in the mirror should be covered with absorption. It's a good idea to treat a larger area of the wall than you identify with the mirror, so you'll be free to move around a little without leaving the RF Zone. Once the side wall locations are identified do the same on the ceiling. Although it's more difficult to slide a mirror around on the ceiling, one way is to attach a hand mirror to a broom or garden rake with rubber bands. Finally, it's important to understand that the range of frequencies absorbed affects the quality of the RF Zone. Some people use thin panels made of fiberglass or foam, or blankets, and believe that's sufficient. But those materials absorb reflections at higher frequencies only. A MiniTrap is therefore a better choice because its absorption extends to a much lower frequency, thereby making the RF Zone effective down into the bass range. The three photos at left show the left, center, and right sides of a room that's been treated to avoid all early reflections. There's a High Frequency MicroTrap on a microphone stand on each side, halfway forward between the loudspeakers and listening position, plus two HF MiniTraps on the ceiling. Notice that the small drink table in front of the couch has a towel draped over it to prevent reflections off its glass top surface. Top |
|
REAR
WALL REFLECTIONS Just as side wall early reflections can harm imaging and create comb filtering artifacts, so can the rear wall if it's less than ten feet behind you. In this living room the lowest pair of MiniTraps are the HF type because they're right behind the heads of people seated on the couch. The upper two MiniTraps are standard types, as are the two straddling the corner at the top of the wall where it meets the ceiling. The MiniTraps mounted flat on the wall are spaced four inches away using post bases as described in THIS article. Top |
|
COUCH
AND CHAIR REFLECTIONS Even a reflective couch or chair back can cause severe comb filtering that damages clarity and spacial imaging. As a test, I measured my living room leather couch four ways - bare, with a thin blanket doubled up, with two-inch thick batting only, and with the batting plus a thick material called "Soft and Fluffy" that I bought at a local Jo-Ann Fabrics store. The audible difference was substantial, though when measured the changes do not appear as large as they sound. Rather than post all four graphs showing small incremental improvements, the graph in Figure 2 at left shows the response four inches in front of the leather back when it's bare, and again with the batting and additional thick cover. This corresponds to the two setup photos at left. I was surprised to see the response become a little worse at a few frequencies after adding the batting and cloth cover. So I measured again and got the exact same results. Such is the nature of reflections and comb filtering! But the sound is much better with the cover. Even though it looks like the DPA measuring microphone in the photos is only half an inch in front of the couch back, that's just the camera angle and it's really about four inches away. Nothing was moved from one test to the next, so the improved response is due entirely to the addition of the batting and thick fabric cover. Ideally, when listening to surround movies and music the seat backs will not be above head level anyway, since that blocks sound from the rear speakers. Top |
|
Entire contents
of this site Copyright © 2004- by RealTraps, LLC. All rights reserved. |
)
)
)
)
)
)
)
)
)
)
